Showing posts with label Flipped Videos. Show all posts

Friday, February 6, 2015

10 Reasons To Make Your Own Flipped Videos
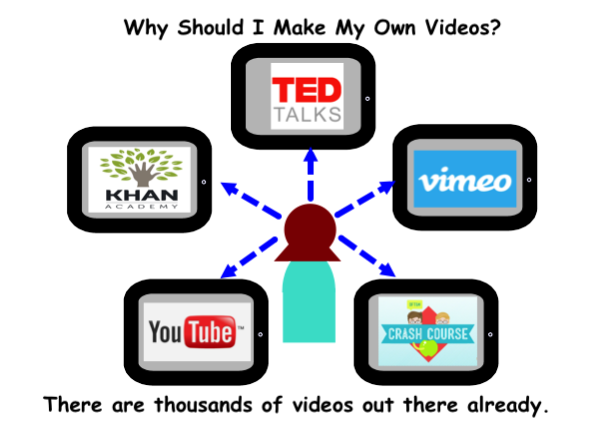
10 Reasons To Make Your Own Flipped Videos


I believe that the Flipped Classroom model is less about the videos and more about the environment created in your classroom.  I do however, believe strongly that you should 
make your own videos.  


1. Trust

  • While online presenters like Paul Anderson (Bozeman Science), Tyler Dewitt (Tyler DeWitt) and Hank Green (Crash Course) are wonderful and their materials are well done, IT'S NOT YOU. Your students need to feel secure in their understanding, that the material being presented is the same material upon which they are going to be assessed.  I would however, encourage educators to take advantage of some of the tremendous work that is  available to back-up ad supplement the work you produce for your students.   

2. Familiarity

  • Your students know you. They are familiar with your expectations and the modes of learning that take place in your classroom. This familiarity plays hand in hand with the issue of trust mentioned above.  If students feel comfortable they are more likely to hear your message. 

3. Language and Vocabulary

  • The language and vocabulary for your state, district, school and classroom varies.  Even with the new NGSS, interpretation of language may differ.  Therefore, students need to see and hear the terms and phrasing used in the assessment process in the presentation of the material. 

4. Rituals and Cues

  • Students are comfortable with rituals. There are certain aspects of your classroom, pedagogy, phrasing, cues and clues are a necessary aspect of the learning process.  You may have certain means of delivering information or terms used to help students understand important concepts, topics, formulas that will assist them in preparing for quizzes, tests and otter forms of assessment.  

5. Examples and Stories 

  • The examples and stories used in other presenters work may not always be the same as the samples and information that you find important to share with your students. The story is never the same with a different narrator. It is your personal touch that makes the examples and stories come alive for your audience.     

6. Owning the Learning

  • You can give something away unless you own it first.  In creating your own videos you are giving the students the knowledge you own.  It becomes a gift and therefore is valued more by your students as they take ownership. 

7. Your Time is Valued

  • Students will appreciate and value the information more because you put in the time and energy to create this for for them.  

8. Personal Connection

  • The value of the flipped lesson is not in the videos but in the pedagogy of the classroom. It is the Personal connection that is created in the classroom through the Inquiry Based, Project Based, Mastery and  Gamification Learning that is enhanced through the connection to the information delivered in the video. Students build rapport with people they are familiar with, trust and appreciate.  

9. Because it is Your Classroom

  • Your Classroom, Their Learning.  Whether you are the "Sage on the Stage" or the"Guide on the Side", it is your classroom and you are ultimately responsible for the process of their learning.  

10. Empowers You

  • We all have egos and their is nothing more empowering than creating something of value.  Whether you are validated by your own students, your colleagues or a student from Pakistan who watched and learned from the video you uploaded to YouTube, we all love to be valued. 

Saturday, April 19, 2014

Organize Your Videos Like a Coach

Organize Your Videos Like a Coach

Confucius said,

“I hear I forget,
I see I remember,
I do I understand”

The Four Principles of Teaching - John Wooden

Explanation

Demonstration

Imitation

Repetition

One of my mentors in education is the Late Great John Wooden.  I use his pyramid of success in my classroom as a model for Educational Excellence.  His approach to coaching and education are timeless and can be adapted for any subject matter. Whether you are teaching addition and subtraction, or the quadratic formula, the bones of the skeleton or the eight steps of digestion, a lay-up or the intricacies of the half court trap, to be an effective educator the steps do not change.  The educator must be able to provide the student each of these four levels of the teaching process in order to impart knowledge.

Explanation must include both the basic how, what, when and where, but most importantly the why.  If the learner cannot understand he value of the information or skill, the knowledge will not be passed on to long term memory.  In order to become a useful part of the student's knowledge base, there must be a need to associate it to previous knowledge as well as future need.

Videos need to be a clear and concise explanation, of what the information is, why it is important and how it can be used.

Demonstration must be done without a preconceived idea of what the learner knows.  The demonstration should address all aspects of the skill from the most rudimentary step to the ultimate conclusion. Demonstration must include the basic steps from beginning to end. Even the most experienced student should find value in reviewing the  basic components of a process or skill.

Videos should provide enough examples to demonstrate the process of utilization of the information. 

Imitation must provide the opportunity to succeed without a fear of failure but an incorporation of failure with correction as a means of understanding.  Students should be provided the opportunity to mirror the instructor throughout the process or skill.  It is through imitation that the student gains an understanding of the concept and a confidence in their own ability to succeed.

Videos should offer gaps for students to imitate the process with immediate feedback.


Repetition must be enough to develop a comfort level while keeping the information fresh.  Avoid at all costs the drill and kill that is detrimental to the ultimate goal of learning. Repetition should provide insight for both the instructor and the student as to the level of mastery and the need for further instruction and/or practice.  Repetition should serve as the measuring stick as to the next steps in the learning process.

Lastly, the video should provide opportunity for the students to continue the process on their own. 

Monday, March 24, 2014

Making a Flipped Digital Resource - Screencast-O-Matic

Making a Flipped Digital Resource 
Screencast-o-Matic

How would you like to make a video and upload it to a You Tube channel in less than 20 minutes?

I am going guide you through the video production using a chemistry lesson from a  SMART Notebook file, and software from Screen Cast–O-Matic to create, publish and upload a digital resource. 

The Screen Cast-O-Matic software combines a very basic recording platform, some simple editing features and options to save the movie to your own data files or upload directly to a You Tube channel. Screen Cast-O-Matic can be used with any SMART Notebook, PowerPoint or Key Note presentation.  The screen capture software allows for the control of the capture screen size, which makes it easy to work within smaller windows on a larger platform.

The software can be downloaded for free at
screencast-o-matic.com.The free version has a fifteen  minute recording limit.  The full version can be purchased for $12.99 and allows for longer recording time and additional editing tools.

This example is making a video about how to write electron configurations in chemistry. This lesson uses a pre-made SMART Notebook lesson.  I prefer to pre-make my lessons with animations of the steps fading in on mouse clicks.  I personally do not like the way I write with the mouse or using a wireless pad.  But, this is entirely up to you and what the objectives of your lessons are.

First I open the platform for my lesson.  In this case my SMARTnotebook software.

Next locate and activate Screencast-o-matic (SOM) from the dock on my desktop.


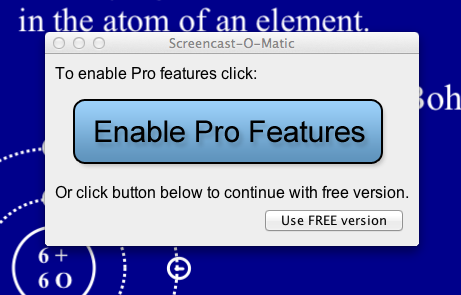
When the SOM software opens it asks if you would like to enable the pro features purchase or use the free version. The free version is fine for anything under fifteen minutes.
Remember to keep your videos short.


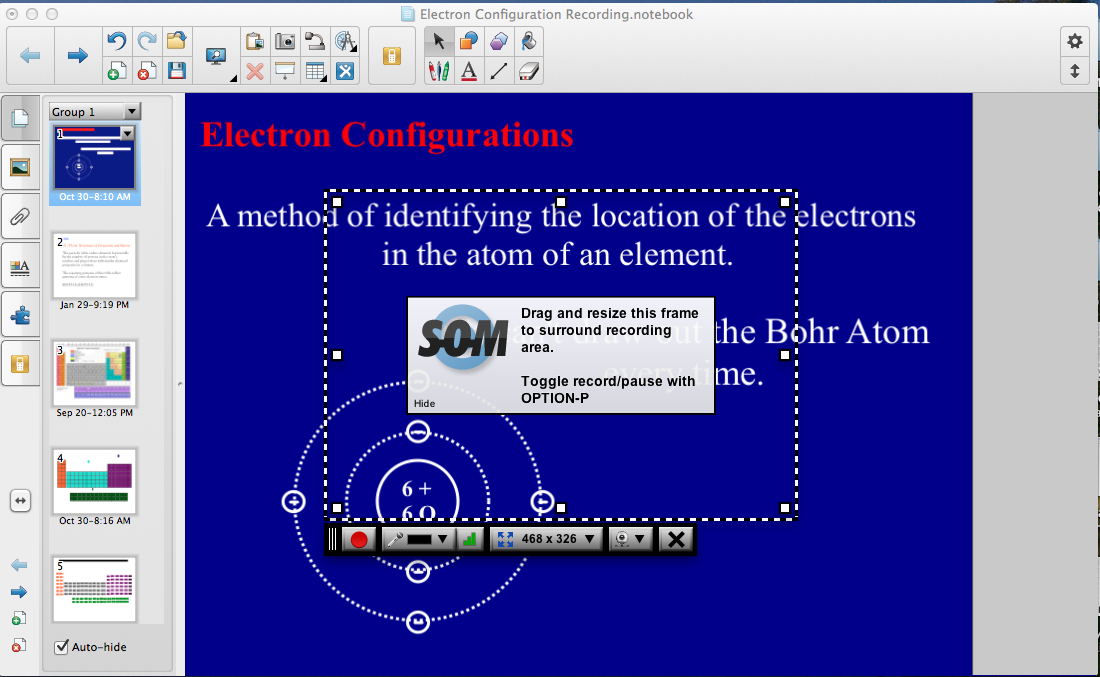
The SOM will open a frame with a control center on the bottom. This frame can be adjusted to capture as much of your desktop, SMART Notebook, PowerPoint or Key Note as you are going to use in the video.


The original frame size may not fit the portion of your screen that will be recorded.  The SOM software will prompt you to manipulate the frame to the size needed for your recording. 


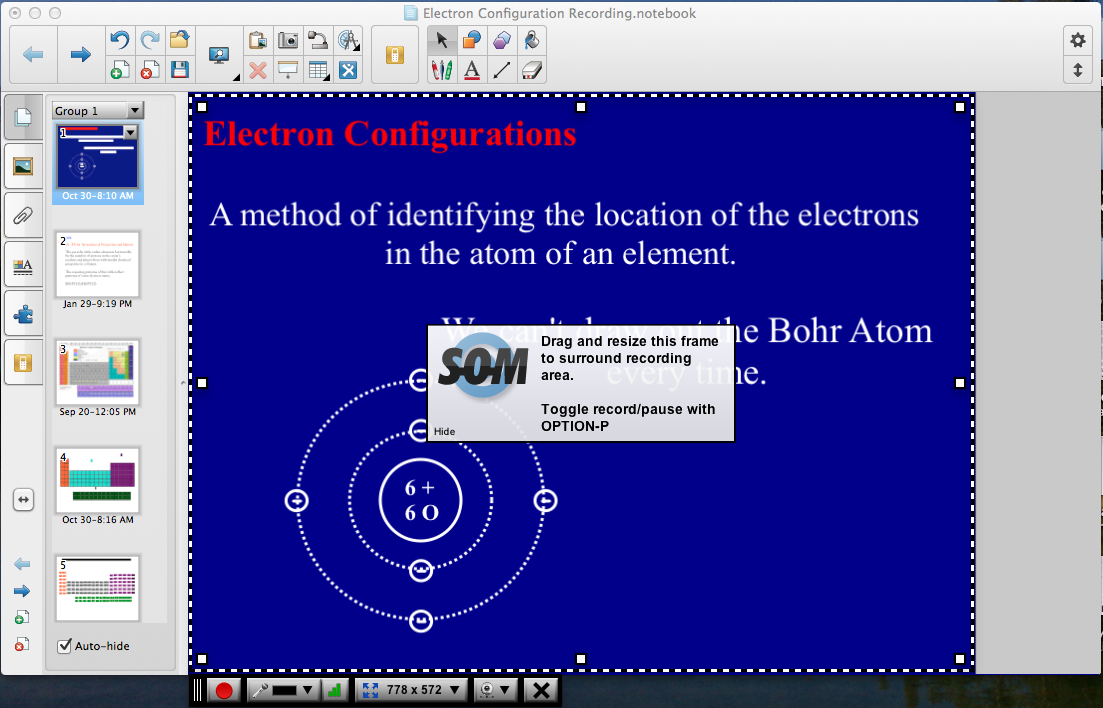
Drag and re-size the frame to the appropriate size for your recording.  I capture only the workspace for the lesson.  I leave the tools outside the frame.  I still can use those tools without them being seen in the recording. 


The control panel for the SOM software is at the bottom of the recording frame.


The red circle is the record/pause control.  Make sure the mic and sound check is working during the recording.  There is nothing worse than getting the perfect take and your mic is not on.


You can set up an external camera if you would like to add your image to the recording.  The X on the right will close the recording window. 

When you begin recording the record button changes to a pause button. Use this to provide time to catch your breath, gather your thoughts, change slides, etc….

The recording time will also appear.  Be aware of the fifteen minute time frame as you record your video.


Once you begin recording, whatever you do on the software platform will be recorded.  Your voice, writing, typing, manipulating objects, changing slides, animations, slide transitions, will all be recorded by the SOM software.


At the end of the recording press DONE.

The SOM upload screen will appear.

You can preview your video at this point.


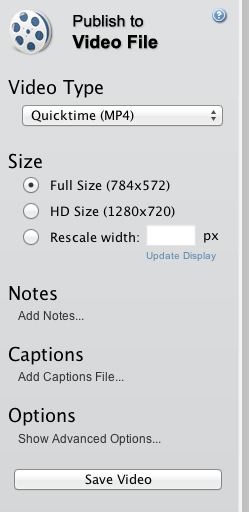
There are three options for upload.  Publish to Screencast-O-Matic,  publish to You Tube or publish to a video file.  Always publish to a video file.  This allows you to have a file available to use outside of SOM or Your Tube.      


When you publish to a video file you have the opportunity to add notes to the video or add captions and some other basic options.

Save at Full Size.  HD is nice for your computer, but HD affects download speeds and students may not have great bandwidth at home.

The MP4 option is recognized by most formats on the web.


After saving to a video file, you can then publish to SOM or You Tube.  Or you can upload the file to your learning management system of online platform. 


Tuesday, March 18, 2014

Software for Creating Flipped Video

Software for Creating Flipped Video
New software is introduced everyday for the creation and processing of digital resources.  There are a wide variety of software available form full movie production editing, to simple shoot and load technology.  The software for Mac may differ from PC and Apple apps may differ from Android apps.
Each educator needs to find a few pieces of software for media production and a means to upload the digital content and work with them until the production and upload process become part of the educator’s digital toolbox.
Camtasia Studio   techsmith.com/Camtasia
Camtasia is another screencasting tool made by Techsmith that allows you to record, customize and edit your content videos. It allows you to record your screen, edit the recordings and more. Camtasia is one of the more commonly used tools used by teachers who flip.


Screencast-O-Matic   screencast-o-matic.com
This tool has both a
 free and a paid 
option and it works
on any platform,
 since it is web-
based. The free 
version allows you 15 minutes of video capture, and the site also allows you to either host the video on their website or download it for use somewhere else. This website also allows you to upload directly to YouTube.


Screenchomp (iPad App) techsmith.com/screenchomp
If you need a simple basic software, you may find that Screenchomp is all you need to produce content videos. Screenchomp is a Techsmith app made for the iPad. It is a digital whiteboard that allows you to record and easily store your digital materials. Screenchomp’s layout is easy enough even for younger students to be engaged in media production.

ShowMe (iPad App)   Showme.com
ShowMe is a simple digital whiteboard that allows you to record your lessons. It offers an online community where you can share videos. ShowMe has an RSS feed function that makes it easy to embed the feed automatically into your online environment, blog  or website.


iMovie (Mac, iPad App, iPhone App)
iMovie is part of the iLife package on the Mac. It is also a pretty groovy app for the iPad and iPhone. iMovie makes it easy to turn your home or content videos into amazing trailers and/or films. It uses very user friendly drag and drop features. All you have to do is drag
your recorded video, photos, sound track or parts of it, arrange it as
you please, drag in titles and transitions. iMovie allows for direct uploads to your YouTube Channel.


Windows Movie Maker
Windows Essentials is a free download from Microsoft. It comes as the basic video editor in the bundle from Microsoft. Movie maker allows you to drag and drop video clips, still images and audio files to create digital content.   It allows you to edit video footage but it is a stripped down version of iMovie.


Educreations (iPad App)
Educreations is an iPad app that allows you to use your iPad as a whiteboard. You can upload pictures from your photo album and annotate over them. You can also record your voice as you annotate to create more interesting video lessons.


Explain Everyting (iPad App)
Explain Everything is an easy-to-use design interactive whiteboard that lets you annotate, animate, and narrate explanations and presentations. You can create interactive lessons, activities, assessments, and tutorials. You can import Photos, PDF, PPT, and Keynote files.


Start Flipping Now, With Videos Online.

START FLIPPING WITH VIDEOS ONLINE NOW


If It Ain’t Broke, Don’t Fix It

“I don’t know how to make videos.”
“I don’t have the time to record and edit every lesson.”
 “I don’t have the equipment or the budget to do this.”

Okay fine.  There are thousands of videos already out there on the web that will provide the information you need to convey to your students for the purpose of a flipped lesson.  All you need to do is find the right bank of videos that will fit your classroom environment and the needs of your students to start the process.  Once you have created a flipped environment in your classroom it will be easier for you to begin slowly integrating your own video pieces into the curriculum.  How great is it that you have the opportunity to bring experts from all over the world into your classroom curriculum and share knowledge from great scientific minds at the flip of a mouse or a swipe of a touch screen.

Here are some online video resources for you to begin flipping your science classroom.

How do you calculate Boyle’s Law?  What are the three major classifications of Rock?  How do you draw a ray diagram for lenses?  If you need a video on it, you can probably find it on Kahn Academy.  This is the brainchild of Salman Kahn, who believes in a free education for all by letting video recreate education. Educators can register, set up classes and monitor student progress through the platform and create assessments to challenge students to complete the standards before moving on to the next level.

iTunes U opens up your classroom to thousands of ready-made courses, college lecture series, and online courses.  Educators can use the course manager iTunes software to develop their own courses or use the vast iTunes libraries to enhance their current courses.


TED Talks   http://www.ted.com
                                       Like the TED saying claims “Ideas Worth Sharing”.  TED provides opportunities for educators to introduce their students to the future.  To hear how great minds think and to discover the possibilities that are on the horizon.  TED brings experts into your classroom or students homes without the cost of speakers or planning field trips.  Basically educators are limited only by their own imaginations. Imagine the possibilities.


TED Ed   http://ed.ted.com
TED Ed is TED’s version of the educator portal.  The TED Ed site provides educators the opportunity to create online classrooms and assessment opportunities to hold students accountable for viewing online videos.  The TED Ed site allows educators to use any TED Ed video, TED lecture or YouTube video.  Educators can utilize multiple choice and short answer questions, additional resources and going further options to create flipped lessons.
 
                                       If it is not on Kahn Academy it will definitely be found on You Tube.  You Tube has it all from the best to the worst. Using the spotlight feature, educators can develop lessons and assessment opportunities for videos found in the You Tube portal.  However It may be more effective for both the educator and students to utilize the url address or embed codes to add specific You Tube videos to your current website, blog or LMS.  There is also the option of utilizing You Tube videos in the TED Ed platform.  


 Teacher Tube   http://www.teachertube.com
This is You Tube for education.  This site provides many video options without the fear of appropriateness for your students. Educators can share videos from a vast library of subjects including professional development videos for educators.


Socratic   http://socratic.org
 Socratic is a relative new comer to the online media library war.  Socratic is currently only has videos for Biology, Chemistry and Physics, but recently opened up math portals for Organic Chemistry and Calculus.  The site is well organized into subject content topics and sub-categories for each topic.   


Favorite You Tube Channels


Paul Anderson brings twenty years of teaching and technology expertise from Bozeman, Montana and into your classroom through the Bozeman Science Channel on You Tube.  Anderson does an outstanding job of explain topics in biology, Anatomy, chemistry, earth science, physics as well as gamification in the science classroom.  


Hank Green brings his wit and wisdom to each and every video creates by the Crash Course team as he provides overviews of the key concepts of biology, chemistry and ecology.  These videos are fast paced and have great graphics to correlate to both the story behind the concept and the concept itself.


Got only a minute or two and need a quick explanation of a key concept in science.  Visit Minute Earth and watch these animated RSA style explosions of information.  They information seems over simplified but the concepts and learning are clear and concise.


What Minute Earth does for the rest of science, Minute Physics does for the field of Physics. The animations are great and both you and your student’s minds will be engaged.


Do you need a demonstration?  It is probably on Sick Science. Steve Spangler has an incredible library or demonstrations, lab simulations and down right ultra cool science in action.  These videos are excellent discussion starters and provide great opportunities for students to think critically and to explain science phenomena.


V-Sauce is a man on a mission and that mission is exploring the world of science and sharing it with all of us through the Veritasium You Tube channel. This incredible bank of videos opens up a treasure trove of thought provoking and fascinating topics in all avenues of science.  The learning goes beyond the science as the explanations tie in the history and politics that are woven into the understanding of the scientific phenomena.


The ultimate channel for all things chemistry from Nottingham University in England. There is a video about each element on the periodic table. Each week a new video is uploaded concerning science news, interesting molecules and other stuff from the world of chemistry. The featured narrator is a cross between, Doc Brown meets Albert Einstein as a proper English Gentleman.


This list is a great starting point for you to begin searching what is already out there and available for you to use.  Explore, explore, explore!  Find a site or two that fits your teaching style and the needs of your students.  Use a couple of different sites to create levels based upon student levels and abilities.  Provide options for true differentiation and allow students to explore these options as well as other sites and channels that may serve the needs of all of the students in your classroom. 


The possibilities are endless!!! Imagine the possibilities!!!